Desktop Application
Visual workflow designer for Windows – a complete guide for every user
What is the Desktop Application?
The Aurora Workflows Desktop Application is a visual designer for Windows. It lets you build, test, and publish automation workflows without writing code. You assemble a workflow by connecting task blocks on a canvas – similar to a flowchart – and then run it directly inside the designer to see what happens.
The application is built on WPF (.NET 10) and runs on Windows only. No installation of any additional runtime is required beyond the shipped executable.
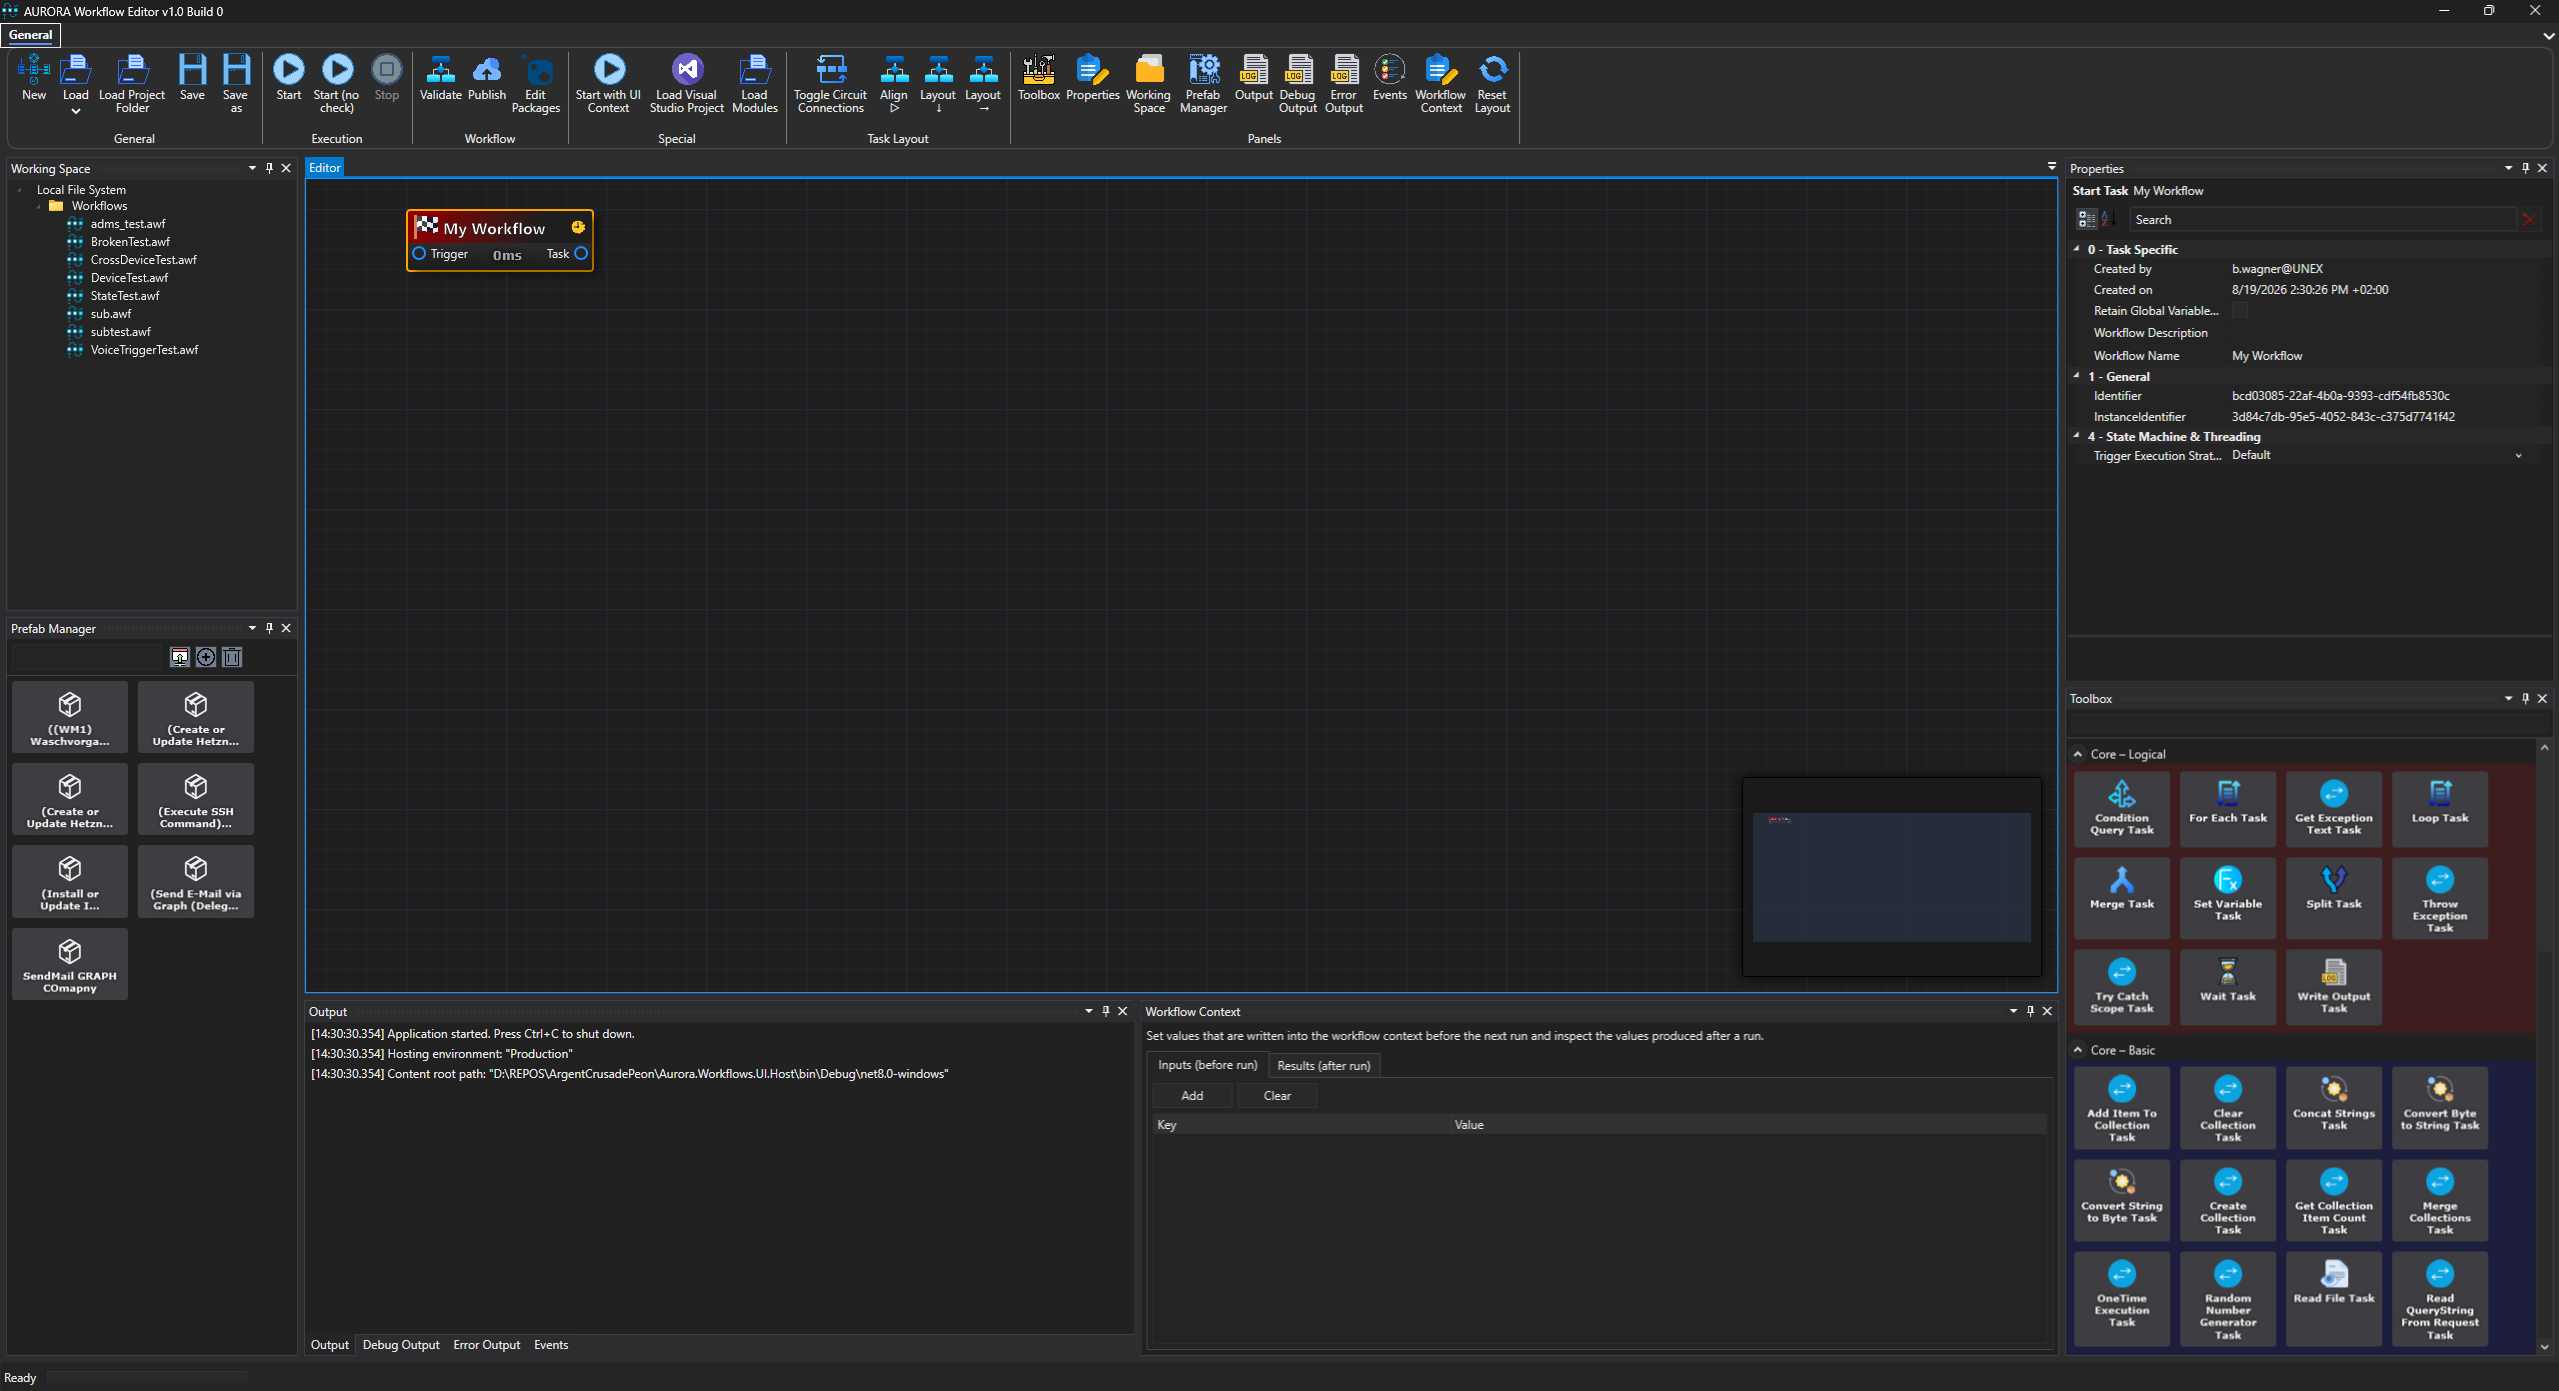
Application Layout at a Glance
When you open the application you see four main areas:
| Area | Where | What it does |
|---|---|---|
| Menu bar | Top | File operations, run/stop controls, theme switcher, and advanced options. |
| Toolbox | Left panel | A categorised, searchable list of every available task and trigger. Drag items from here onto the canvas. |
| Canvas (editor) | Centre | The main workspace where you build and connect tasks visually. |
| Properties panel | Right panel | Shows the settings of the currently selected task. All task properties are edited here. |
| Output / Log panel | Bottom | Shows real-time log messages, debug output, and task events while a workflow is running. |
| Project Explorer | Left (tab) | Shows the file system tree for the current working directory so you can open workflow files directly. |
| Workflow Hosting | Panel (on demand) | Lists workflows and nodes on a hosting engine and lets you start, stop, pause, delete or update hosted workflows. See Workflow Hosting. |
Creating Your First Workflow
- Start the application. A blank workflow canvas opens automatically with a single Start node already placed.
- Find a task in the Toolbox on the left (for example Write Output Task).
- Drag the task from the Toolbox onto the canvas, or double-click it to add it near the Start node.
- Connect the Start node to your new task by dragging from the small circle (output connector) on the Start node to the input connector on the new task.
- Click the task to select it, then fill in its properties in the Properties panel on the right.
- Press F5 or click the green Run button to execute the workflow. Watch the output in the log panel at the bottom.
- Press Ctrl+S to save the workflow as an
.awf(JSON) or.awfc(container) file.
The Canvas
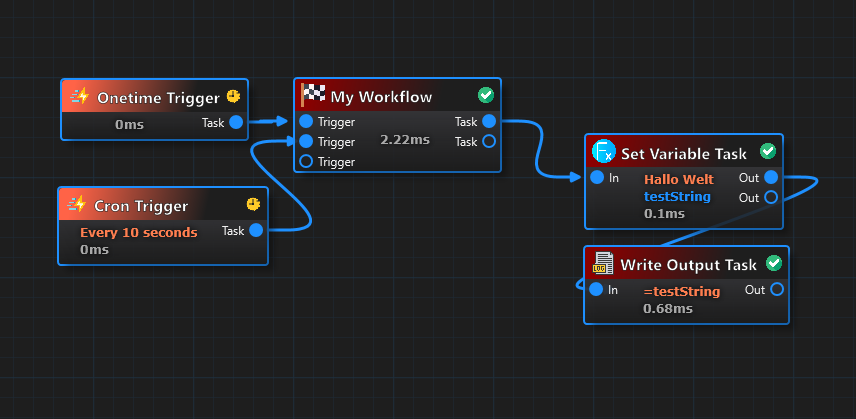
The canvas is an infinite, zoomable, pannable workspace where you lay out your workflow.
Navigating the Canvas
| Action | How to do it |
|---|---|
| Pan (move around) | Hold the right mouse button and drag, or hold Space and drag with the left button. |
| Zoom in / out | Scroll the mouse wheel up/down. |
| Zoom to fit all nodes | Press Ctrl+Shift+H or use the View menu. |
| Select one node | Left-click on it. |
| Select multiple nodes | Hold Ctrl and click each node, or drag a selection rectangle over them. |
| Deselect all | Click on an empty area of the canvas. |
Adding Tasks to the Canvas
There are three ways to add a task:
- Drag & drop from the Toolbox on the left onto the canvas.
- Double-click a task in the Toolbox to add it at a default position.
- Press Ctrl+T or right-click an empty spot on the canvas to open the quick-add menu, then type to search and click a task to place it at that position. Close it with Esc.
Connecting Tasks
Tasks are connected by drawing a line from one node’s output connector (right side, small circle) to another node’s input connector (left side). The connection represents the execution flow: the left task runs first, then the right task.
- To draw a connection: click and drag from an output connector to an input connector.
- To remove a connection: right-click the connection line and choose Disconnect, or click the connector and press Delete.
- A connector can only have one connection at a time. Connect it to a different node to replace the existing connection.
Moving and Arranging Nodes
- Drag any node to reposition it. Connected lines follow automatically.
- Use Auto Layout (Ctrl+L) to automatically arrange all nodes in a clean top-to-bottom or left-to-right layout. Two layout directions are available and can be cycled with the toolbar button.
- Selected nodes can be moved together by dragging any one of them.
The Toolbox
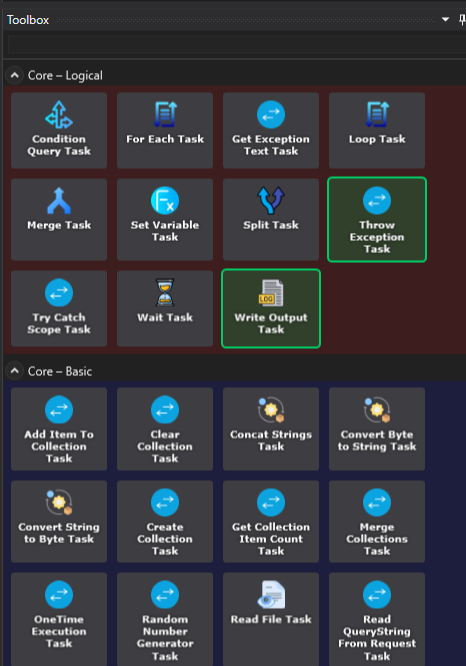
The Toolbox panel (left side) lists every task and trigger available in the current session. Tasks are grouped into categories:
- Core Basic – the most commonly used tasks (Set Variable, Write Output, Wait, etc.).
- Core Logical – control-flow tasks (Loop, For Each, Conditional Scope, Try/Catch, etc.).
- Extensions – tasks from Aurora extension packages (HTTP, file I/O, e-mail, scripting, etc.).
- Custom / External – tasks loaded from your own assemblies or NuGet packages.
Searching the Toolbox
Type in the search box at the top of the Toolbox to filter tasks by name in real time. The search is instant and covers all categories at once. Clear the search box to return to the full list.
Toolbox Highlighting
When you select a task on the canvas, the Toolbox highlights tasks that are compatible with the selected task’s output. This helps you find the right next task quickly.
The Properties Panel
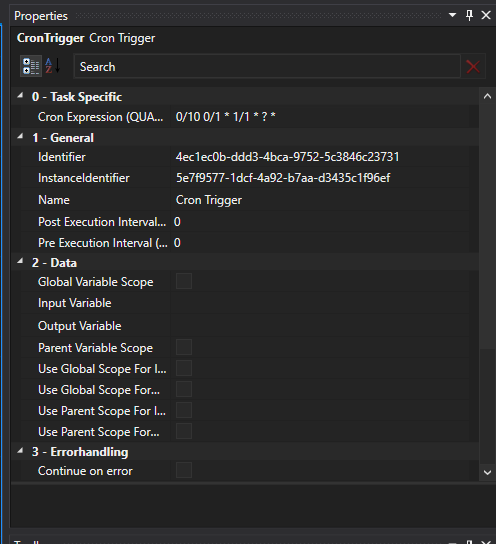
Click any task on the canvas to open its settings in the Properties panel on the right. Every property you see here is specific to that task type.
Property Groups
Properties are grouped into tabs or sections:
| Group | Contains |
|---|---|
| Task-specific | The main settings unique to that task (e.g. the URL for an HTTP task, the file path for a file task). |
| General | Name, ContinueOnError, RetryEnabled, MaxRetries, RetryInterval, PreActionInterval (wait before), PostActionInterval (wait after). |
| Variables | CustomInputVariableName, CustomOutputVariableName, scope switches (Use Global Scope, Use Parent Scope). |
Expression Fields
Many properties show a text field with an expression icon (‹/›). These fields accept a full C# expression that is evaluated at runtime by the Roslyn scripting engine. For example, instead of typing a fixed file path you can type:
=System.IO.Path.Combine(baseDir, "output.csv")= to make it an expression. Every variable stored in the workflow data context is available by its name as a typed C# local (baseDir, _global_baseDir for the global scope). If you just want a plain text value, type it directly without the = prefix.
Variable Names
The Custom Output Variable Name field determines the name under which a task stores its result. Other tasks can then read that result using the same name. If you leave it blank, the task uses the .NET type name as the key.
Scope Tasks (Containers)
Some tasks are containers – they hold other tasks inside them and control how those inner tasks run. You can recognise them by the expandable Scope area inside the node on the canvas.
Examples of scope tasks:
- For Each Task – runs all inner tasks once for every item in a list.
- Loop Task – keeps running the inner tasks as long as a condition is true.
- Conditional Scope – only runs the inner tasks if a condition is true (like an “if” block).
- Try/Catch Scope – runs the inner tasks and catches any errors so the workflow can continue.
- Async Task – runs the inner tasks on a background thread.
- Time Throttled Scope – runs the inner tasks at most once per configured time period.
- Change Detected Scope – runs the inner tasks only when a value changes.
To add tasks inside a scope: drag them into the Scope area of the container node, or connect them using connectors inside the scope. A scope task with no children will not do anything useful.
Triggers
A trigger decides when the workflow starts. You configure triggers on the Start node. Click the Start node and look for the triggers section in the Properties panel, or use the dedicated Triggers tab.
Available triggers:
- One-Time Trigger – runs the workflow exactly once when you press Start.
- Timed Trigger – runs the workflow repeatedly on a fixed interval (e.g. every 30 seconds).
- Cron Trigger – runs on a schedule defined by a cron expression (e.g. every day at 08:00).
- File Trigger – runs when a file is created, changed, or deleted in a watched folder.
- HTTP Listener Trigger – runs each time an HTTP request arrives on a configured URL.
A workflow can have multiple triggers active at the same time. You can also set whether multiple trigger firings run sequentially (one at a time, queued) or in parallel (each firing starts immediately).
Running and Stopping a Workflow
| Action | How to do it |
|---|---|
| Start the workflow | Press F5 or click the Start button in the ribbon. |
| Start (skip validation) | Press Ctrl+F5 or click Start (no check) in the ribbon. Skips the pre-run validation check. Use this if you know the validation warning is a false positive. |
| Start on UI thread | Click Start with UI Context in the ribbon (Special group). Runs the workflow on the main UI thread. Required for tasks that interact directly with UI elements. |
| Stop the workflow | Press Shift+F5 or Ctrl+Pause, or click the Stop button in the ribbon. The engine sends a stop signal; running tasks finish their current step before stopping. |
| Validate only | Press F4 or click the Validate button. Checks the workflow for errors without running it. |
Task Status Indicators
While the workflow is running, each node on the canvas shows a coloured status indicator:
| Colour / Icon | Meaning |
|---|---|
| ⏳ Spinning / Blue | The task is currently executing. |
| ✅ Green | The task completed successfully. |
| ❌ Red | The task finished with an error. Check the log panel for details. |
| Grey / no icon | The task has not run yet, or has been reset. |
Validation
Before starting (unless you use Ctrl+F5), the application automatically checks your workflow for common mistakes – for example a SetVariableTask with no Expression set, or a scope task with no children. Validation errors are shown in a dialog and the workflow will not start until they are resolved.
You can also run validation manually at any time by pressing F4 or clicking the Validate button in the ribbon.
Saving and Opening Workflows
| Action | How to do it |
|---|---|
| New workflow | Ctrl+N or File → New. You will be asked to confirm before the current workflow is discarded. |
| Open a workflow | Ctrl+O or File → Open. Opens a file picker for .awf and .awfc files. |
| Open recent file | File → Recent Files lists the last opened workflows. Click one to open it directly. |
| Save | Ctrl+S. Saves to the current file. If no file is open yet, it shows a Save As dialog. If the workflow was opened from a hosting engine, it is pushed back to the host after confirmation instead. |
| Save As | Ctrl+Shift+S or File → Save As. Always shows a Save As dialog; choose between .awf and .awfc. |
| New workflow id | Workflow → New Workflow Id (while stopped). Assigns a fresh id so a copied design becomes an independent workflow for publishing and hosting. |
File Formats
Both formats are full designer projects – tasks, connections, node positions, package references and tags – and can be opened, edited and saved by the desktop application interchangeably:
| Format | Content | Best for |
|---|---|---|
.awf | Plain JSON. Safe to open in a text editor and to track in version control (Git, etc.). | Design sources, code review, diffs. |
.awfc | Compiled binary container: the executable workflow, package list, optionally embedded assemblies and the designer data. | Deployment with the CLI Runner or a hosting engine; the same file stays editable in the designer. |
Saving directly as .awfc produces the same container as Publish → Local File System without embedding assemblies. Older containers without designer data are opened as well: the graph is rebuilt from the compiled workflow and laid out automatically.
Copy, Cut, Paste, and Delete
| Action | Keyboard shortcut | Notes |
|---|---|---|
| Copy selected nodes | Ctrl+C | Copies the selected nodes (and their settings) to the clipboard. |
| Cut selected nodes | Ctrl+X | Copies and then removes the selected nodes. |
| Paste nodes | Ctrl+V | Pastes the clipboard content at the current mouse position on the canvas. The Start node is never pasted. |
| Delete selected nodes | Delete | Removes the selected nodes and all connections to them. The Start node cannot be deleted. |
Grouping Nodes
You can visually group related nodes together using a Group box. A group is a labelled rectangle that contains nodes; it does not affect execution order, it is purely a visual aid to keep the canvas tidy.
- Select one or more nodes, then press Ctrl+G or use the Group toolbar button. A group box is drawn around them automatically.
- Give the group a name by selecting the group box and editing its Name in the Properties panel.
- Groups can be moved as a unit by dragging the group box.
Auto Layout
If your canvas gets messy, the Auto Layout feature rearranges all nodes automatically into a clean, readable layout.
- Press Ctrl+Alt+F to apply a left-to-right auto layout immediately.
- A top-to-bottom layout is available via the Layout ↓ button in the ribbon (Task Layout group). There is no keyboard shortcut for this direction.
- Use the Cycle Alignment button in the ribbon to switch between Left, Center, and Right node alignment within each layer. This is ribbon-only – no keyboard shortcut.
Prefabs (Reusable Task Groups)
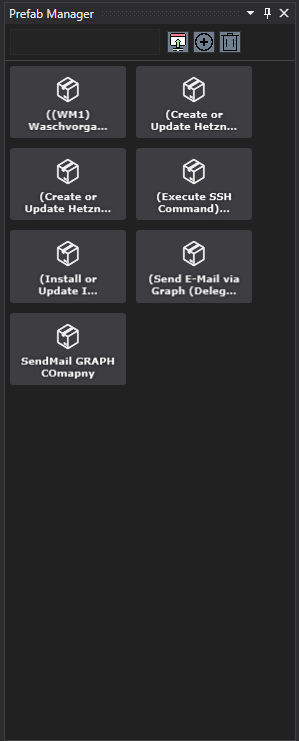
A Prefab is a saved snapshot of one or more selected nodes that you can insert into any workflow later. Prefabs are useful for frequently used patterns, such as a “read file → parse JSON → send HTTP” sequence.
- Create a prefab: Select the nodes you want to save, then click Create Prefab in the toolbar or menu. Give it a name.
- Insert a prefab: Open the Prefab Manager from the toolbar, find your prefab by name (or search for it), select it, and click Insert. The nodes are pasted onto the canvas at the current mouse position.
- Prefabs are stored locally as
.prefabfiles in the application settings folder.
Loading Custom Tasks and Assemblies
The designer can load additional task libraries so they appear in the Toolbox. There are three ways:
Option 1: Load assemblies from a folder
Use File → Load Assemblies From… to pick a folder. The designer scans all .dll files in that folder for task classes and adds them to the Toolbox instantly.
Option 2: Load a Visual Studio project
Use File → Load VS Project… to open a .csproj file. The designer reads the project’s NuGet dependencies, installs the packages automatically, and loads the built output assemblies. This is the recommended workflow when developing custom tasks in Visual Studio.
Option 3: Package Editor (NuGet)
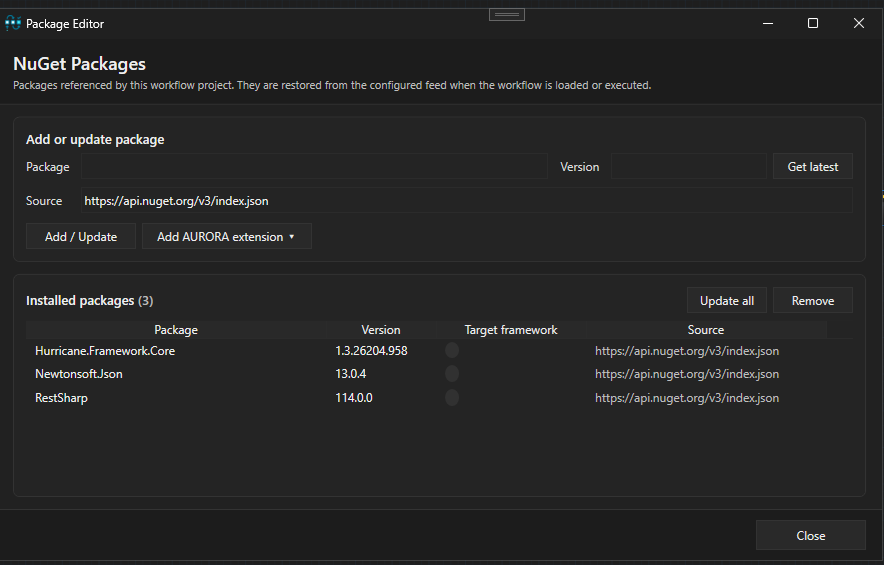
Open the Package Editor via Workflow → Edit Packages in the ribbon (available while the workflow is not running). Packages referenced here are restored from the configured feed whenever the workflow is loaded or executed, and their assemblies are loaded into the Toolbox.
| Control | What it does |
|---|---|
| Package / Version / Source | Enter a NuGet package id (e.g. Newtonsoft.Json), an explicit version or latest, and the feed URL (default https://api.nuget.org/v3/index.json). |
| Get latest | Resolves the newest version of the entered package from the feed. |
| Add / Update | Adds the package or changes the version of an already referenced package. |
| Add AURORA extension ▾ | Lists the official Aurora.Workflows.Tasks.* task libraries found on the feed and adds one with a single click. |
| Installed packages | Shows package, version, resolved target framework and source of every reference. Select an entry to edit it, or use Remove. |
| Update all | Updates every referenced package to its latest version. |
Package references are stored with the workflow in its .awf file and carried over into the compiled .awfc container. Downloaded packages are cached in the .packages folder next to the application. The CLI Runner and hosting nodes restore the same packages before execution, so you normally do not need to embed their assemblies when publishing.
Publishing a Workflow (.awfc)
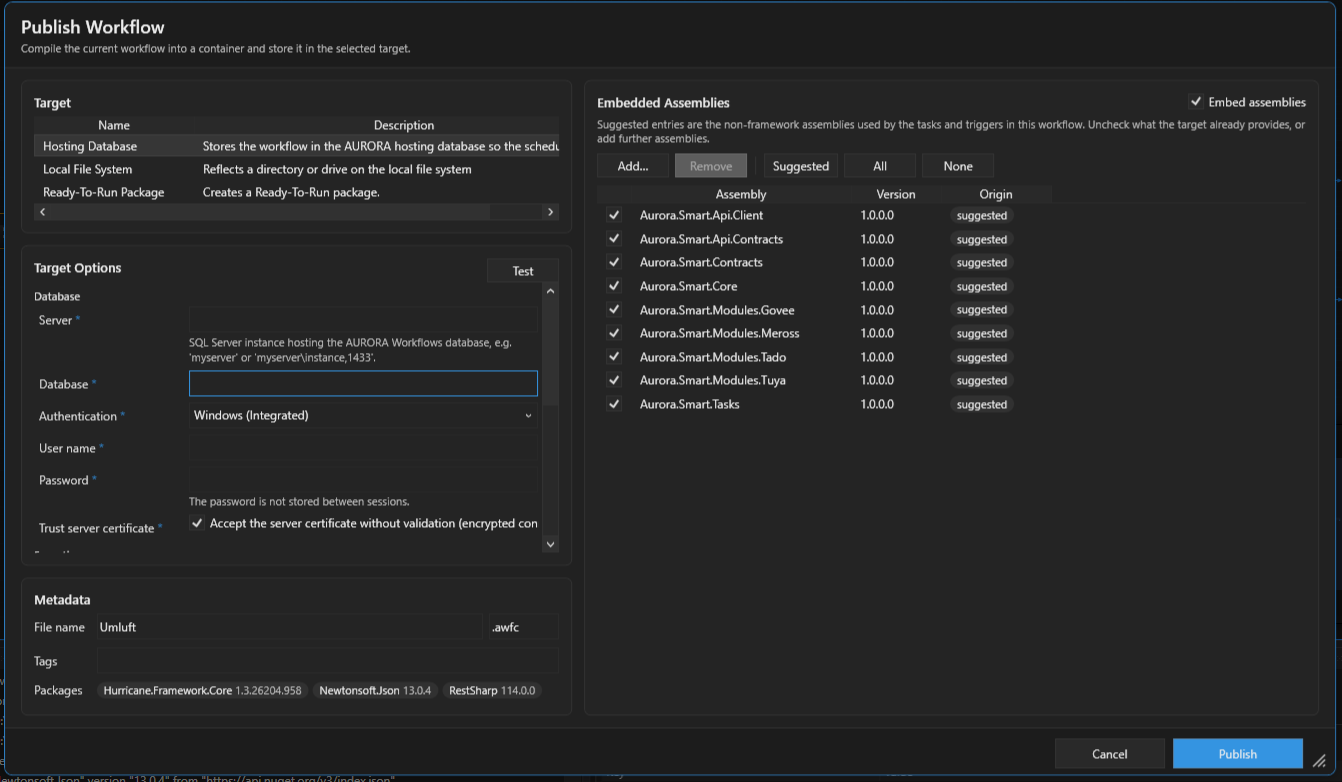
Once your workflow is working correctly in the designer, you can publish it as a self-contained .awfc container. Open the panel via Workflow → Publish in the ribbon (available while the workflow is not running).
Targets
A publish target decides where the container is stored. Targets are discovered as plugins, so additional ones can be added without changing the designer:
| Target | Description |
|---|---|
| Local File System | Writes the .awfc file to a directory or drive. Browse the folder tree on the left and pick the destination. Run the result with the CLI Runner. |
| Hosting Database | Stores the container in a SQL Server hosting database where it is scheduled and executed by the Hosting Engine. Provides its own Target Options (connection, schedule, retries, tags, activate, overwrite) and a Test button to verify the configuration. |
Options of configurable targets are remembered per target between sessions (except passwords).
Metadata and Embedded Assemblies
- File name / extension – name of the container; the extension defaults to
.awfc. - Tags – free-form tags, separated by
;or,, stored in the container metadata. - Packages – read-only list of the NuGet packages referenced through the Package Editor. They are restored by the target at runtime.
- Embed assemblies – when enabled, the selected assemblies are embedded into the container. Suggested entries are the non-framework assemblies used by the tasks and triggers of this workflow; uncheck what the target already provides or use Add… to embed further assemblies manually. Suggested, All and None adjust the selection quickly.
- Designer data – always included. A published container can be opened in the designer again (File → Open or Open in editor from the hosting panel), so the
.awfsource is no longer required to change a deployed workflow.
Steps
- Select the target and, if applicable, fill in and Test its options.
- Check file name, tags and the assemblies to embed.
- Click Publish. The progress bar and status line show compilation, embedding and upload; Cancel aborts the operation.
The same compilation can be run without the designer using the Compiler CLI. A published container can be updated later directly from the Workflow Hosting panel.
Workflow Hosting
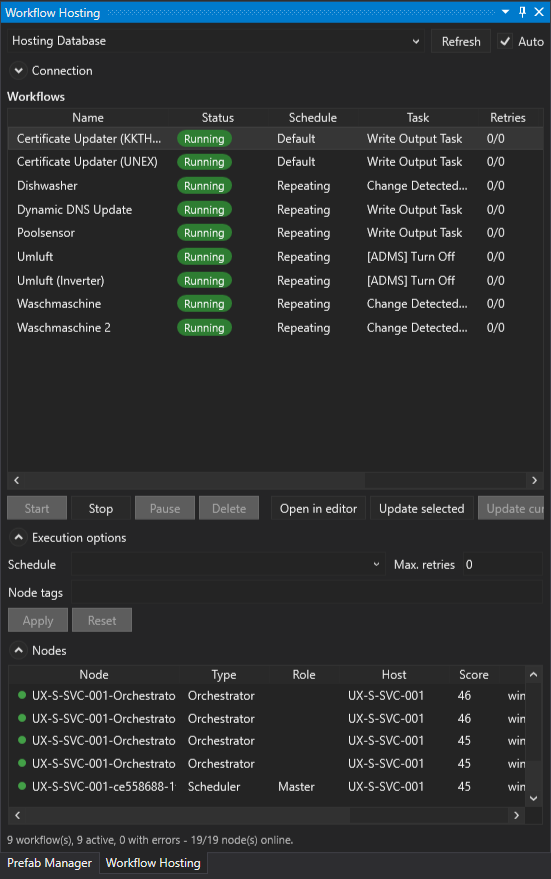
Open the panel via Panels → Workflow Hosting. After selecting a host and entering the connection options, it shows every hosted workflow with status, schedule, current task, retries and tags, as well as all hosting nodes with their role, performance score and tags. Use Start, Stop, Pause and Delete to control a workflow, edit its schedule, retries and node tags in the Execution options area, or Update selected / Update current to replace a hosted workflow with the one open in the editor while keeping its execution options.
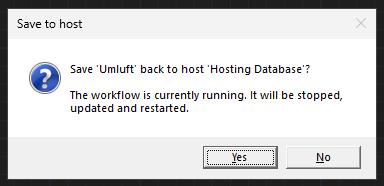
Open in editor (or a double-click) loads a hosted workflow straight into the designer – no local file required. Ctrl+S then saves it back to the host after a confirmation; a running workflow is stopped, updated and restarted.
See the Workflow Hosting guide for the hosting engine, schedule behaviors and node configuration.
Themes
The application ships with multiple visual themes you can switch between at any time via the View → Theme menu:
- Dark – dark background, light text (default).
- Light – light background, dark text.
- Colourful Dark – dark theme with more vivid accent colours.
- Colourful Light – light theme with more vivid accent colours.
The selected theme is applied immediately and remembered across sessions.
Output and Log Panel
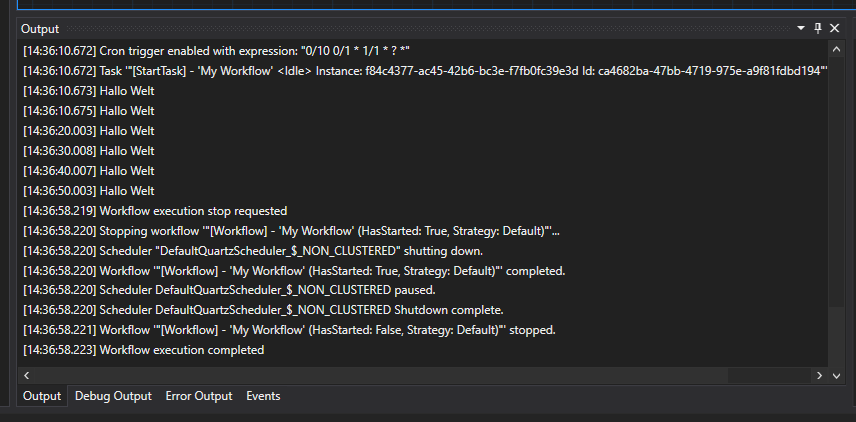
The bottom panel shows what the workflow is doing while it runs. It has three tabs:
| Tab | Shows |
|---|---|
| General | Information-level log messages from the workflow engine and tasks. |
| Debug | Verbose debug messages. Enable with the Toggle Debug button. Useful when troubleshooting a task. |
| Errors | Error and warning messages. A red badge appears on this tab when errors are present. |
The log is limited to the last 5,000 messages per tab to keep the application responsive. Older messages are discarded automatically.
Keyboard Shortcut Reference
| Shortcut | Action |
|---|---|
| Workflow File | |
| Ctrl+N | New workflow (asks for confirmation) |
| Ctrl+O | Open workflow file (.awf) |
| Ctrl+S | Save (prompts for filename if unsaved) |
| Execution | |
| F5 | Start the workflow (runs validation first) |
| Ctrl+F5 | Start the workflow without validation |
| Shift+F5 | Stop the running workflow |
| Ctrl+Pause | Stop the running workflow (alternative) |
| F4 | Validate the workflow without starting it |
| F9 | Toggle debug output |
| Editing | |
| Ctrl+C | Copy selected nodes |
| Ctrl+X | Cut selected nodes |
| Ctrl+V | Paste nodes at current mouse position |
| Delete | Delete selected nodes |
| Ctrl+G | Group selected nodes into a group box |
| Layout & Navigation | |
| Ctrl+Alt+F | Auto-layout all nodes left-to-right |
| Ctrl+T | Open quick-add task menu at current mouse position |
| Mouse wheel | Zoom in / out on the canvas |
| Right-click + drag | Pan the canvas |
| Esc | Close the quick-add task menu |
| Prefabs | |
| Ctrl+E | Create a prefab from the current selection |
| Ctrl+Shift+E | Insert (paste) a prefab from the Prefab Manager |
Tips and Troubleshooting
- Workflow does not start? Check the validation dialog for errors. A common issue is a
SetVariableTaskwith an empty Expression field. - A task shows a red error? Click the task and read the Last Error Message property in the Properties panel, or check the Errors tab in the log panel.
- Custom task not appearing in Toolbox? Make sure the assembly is loaded (File → Load Assemblies From) and that the class is public, non-abstract, and extends
WorkflowTaskBase. - Canvas feels cluttered? Use Ctrl+Alt+F for auto layout (left-to-right), or group related nodes with Ctrl+G.
- Workflow runs but does nothing? Make sure your tasks are actually connected to the Start node. Disconnected nodes are never executed.
- Want to reuse a complex sub-flow? Select it and create a Prefab. Then insert it into future workflows in seconds.
- Log output is empty? Enable the Toggle Debug option to see verbose messages from tasks.